Last modified: January 28, 2026
Quest Diagnostics experience
Patients
Fullscript has partnered with Quest Diagnostics to provide fast, affordable blood testing—no test kit required. From your Fullscript account, you can access your Quest order, schedule sample collection, and view results.
For sample collections in Arizona, see Scheduling a Quest blood draw in Arizona.
Paying for your testing
After your provider creates your testing plan, you’ll receive an email with a link to view it in your account.
If your provider hasn’t paid for your testing upfront, you’ll complete payment through Fullscript’s secure checkout process. Your account will show the test cost and any custom lab or interpretation fees attached to your plan. After entering your ZIP code, you’ll select a sample collection option. In many areas, you can choose between Sample collection at Quest Diagnostics ($10) or At-home sample collection with Getlabs ($85).
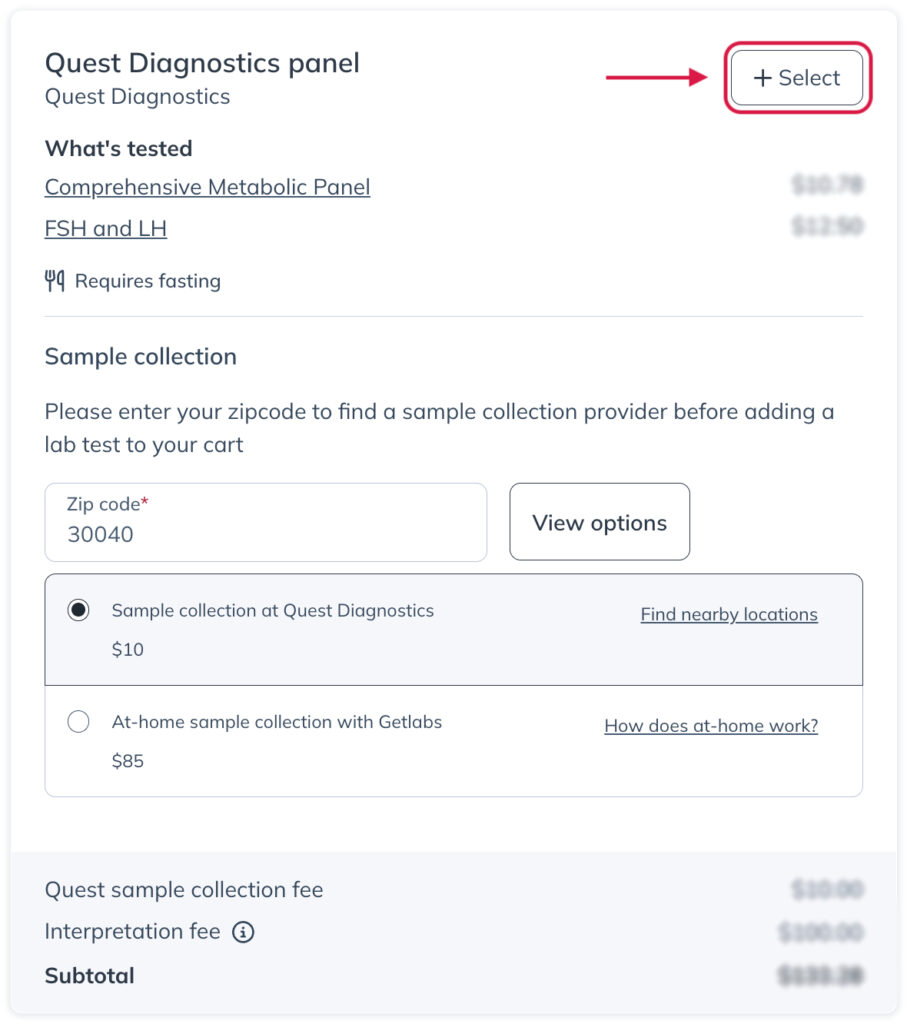
Once you’ve chosen a sample collection method, click Select and pay for your order as normal.
.
Quest digital requisition form
Once payment is complete, you’ll receive a notification when your digital Quest requisition form is ready in your account. The form lists information about you, your provider, and the testing ordered. It usually generates within minutes but can take up to 24 hours. This is all you need to schedule your blood draw with Quest.
You can print the form or show the digital version by navigating to Labs, clicking View details, and choosing View requisition.

Schedule your sample collection
Once you have access to your Quest requisition form, you’re ready to schedule your sample collection. You’ve already paid the sample collection fee during checkout, so no further payment is due when scheduling your appointment or on arrival at the Quest service center.
We recommend scheduling an appointment to reduce your wait time. Quest serves scheduled patients first, so walk-ins may experience delays—especially in the mornings when draw centers are busiest.
Schedule your Quest sample collection:
- In the Labs section, find your test and choose View details.
- Click Schedule appointment.

- Select your nearest Quest patient service center location.

- Choose your preferred date and time and select Schedule your appointment. If you need to choose a different patient service center, click Back to search for another location.

- When your appointment is confirmed, click Add to calendar.

- Once you’ve chosen your appointment date and time, we’ll send a confirmation email with details and a QR code for easy check-in. You’ll also receive automated reminders before your appointment to help you prepare.

Scheduling your Getlabs mobile sample collection:
To book your blood draw with Getlabs, follow the steps in Scheduling your Getlabs blood draw.
Prepare for your test
After scheduling your appointment, review your testing instructions in the Labs tab by selecting View details next to your test. Any special preparation notes from your provider will also appear here.

Some tests require you to fast for up to 8 hours before your draw. If fasting is required, it will be noted in your instructions. Fasting means no food or drinks—except plain water—during this time.

Check if fasting is required before your blood draw. Waiting until the day of your appointment could lead to rescheduling or inaccurate results. If you’re unsure, contact our customer support team.
If fasting is a challenge, book your appointment for early in the morning and bring a drink and snack with you to enjoy afterward.
Sample collection appointment
On the day of your appointment, bring a form of ID and either your printed requisition form or a device to show the digital version.
To check in for your appointment, use the QR code from your email or reminder text, or use the kiosk inside the building to provide your name and date of birth. No payment is due at the time of your appointment, as the test will have already been paid for.
Monitor your test status
Track your testing status in real-time through your Fullscript account. Status updates will show when your test is processing and when your results are ready.
Quest test status changes you may see:
- Requisition pending: Your digital requisition form is being prepared.
- Requisition ready: Your digital requisition form is ready to view or print.
- Appointment scheduled: You’ve scheduled a collection appointment.
- Processing at lab: Quest is processing your sample.
- Partial results available: Some of your testing results are ready to be viewed.
- Results available: All test results are available.
View your results
Sample processing times vary by Quest biomarker, and results will appear in your account as they become available. To view your results, go to the Labs section of your account and click View Details next to the test. If your provider hasn’t reviewed your results yet, you’ll see a View results button to download the Quest PDF.

Viewing result interpretations
We’ll notify you by email when your provider has reviewed and interpreted your final results. From your Fullscript account you’ll be able to View interpretation.

Your provider’s interpretation of results includes an interactive version highlighting where your values fall, trends over time, and personalized notes from your provider to guide next steps. If you have questions about your interactive results report, contact your provider to discuss their interpretation.
