Last modified: October 16, 2024
Journeys
Providers
Overview
Journeys was designed to empower you and your patients by providing continuous, proactive engagement with their health. Through recurring full-body lab testing and advanced biomarker interpretation, Journeys offers a dynamic way to visualize your patients’ progress over time. Meet the demand for patient testing and work more efficiently with a recurring testing model that helps keep patients connected with your practice.
In this guide, we’ll walk you through everything you need to know to get started with Journeys, from setting up your first recurring testing order to understanding your patient’s experience of their interpretation. For an in-depth look at the full benefits of integrating Journeys into your practice, explore the complete toolkit.
Creating a recurring testing recommendation with Journeys
Get started with your first Journeys recommendation for your patient, by first clicking on the Labs catalog from the left hand navigation in your account.
On the far right tile, find the card sharing more information about Journeys. Click View details to start the process.

In the Labs catalog, click View details in the Journeys banner to create a recurring testing recommendation.
Select your panel and frequency for recurring testing
With Journeys, you have the flexibility to choose between two customized panels, expertly selected by our Integrative Medical team and provided by Quest Diagnostics.
First, select the panel type for your patient’s Journey:
- Essentials: 88 biomarkers for $229. This panel goes beyond baseline assessments, providing a detailed insight into essential biomarkers and internal system functions.
- Comprehensive: 116 biomarkers for $469. For a more thorough evaluation, this panel offers an in-depth assessment of a patient’s complete functional health markers.

View the side-by-side comparison of the Essentials vs Comprehensive Journey options by clicking Compare.
Explore the sections below for comprehensive information about the test and the Journeys process, including:
- A full list of biomarkers tested
- Patient instructions
- How the interpretation builder works
- Patient restrictions based on age and state
- Payment and cancellation policies

Once you’ve reviewed and selected either the Essentials or Comprehensive panel, choose the frequency that’s best for your patient’s health – every 3, 6, or 12 months.
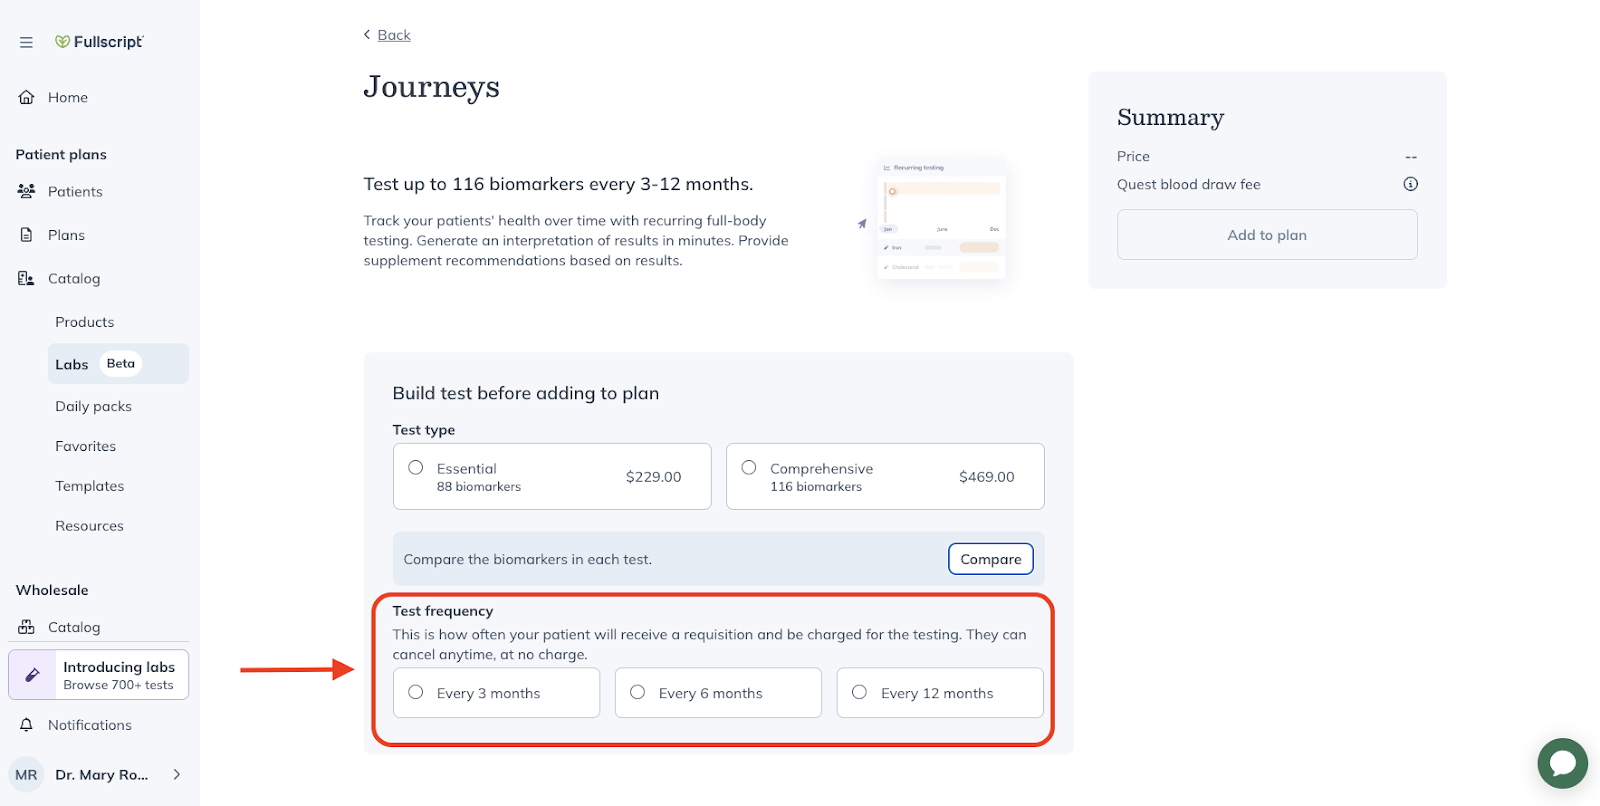
After selecting the Essential or Comprehensive panel, choose the testing frequency.
Sending the Journey to your patient
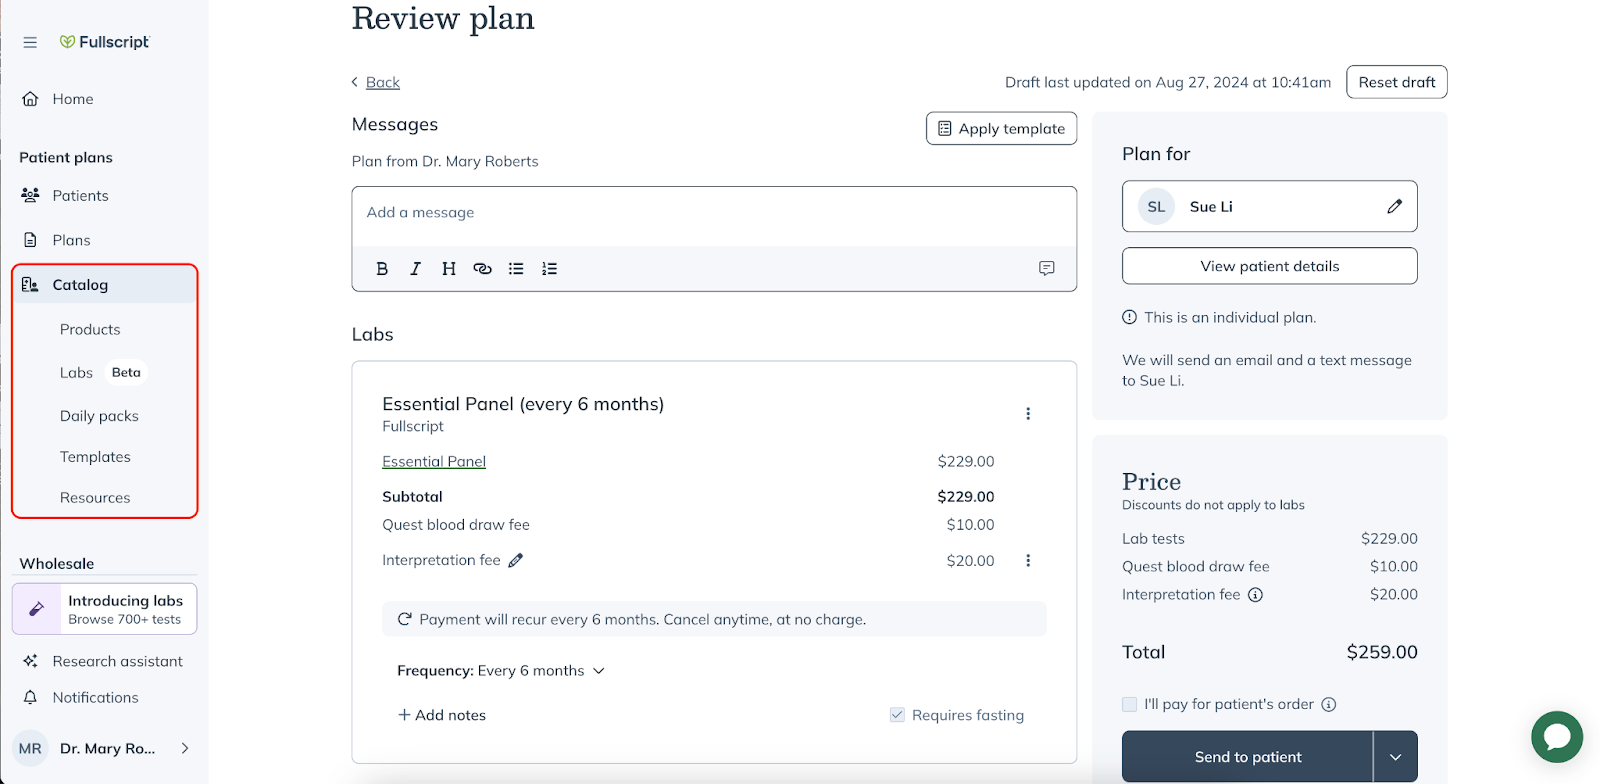
Once you’ve chosen your Journey panel and the desired testing frequency, click Add to plan in the top right Summary section. The total price will be displayed, including the panel cost and the Quest blood draw fee of $10.

Review pricing and choose Add to plan when you’re ready to include the selected Journey in your patient’s plan.
Select Review when you’re ready to send the Journey to your patient.

Choose Review to finalize your patient’s plan before sending.
As with any plan you create on Fullscript, you can seamlessly add other tests or products to the same plan that includes your recurring testing with Journeys. Simply select from the Catalog options to include additional products, lab tests, daily packs, templates, or resources in your patient’s plan.
Use the Catalog in your main navigation to add any additional testing or supplements to the same plan with your patient’s Journey.
Click Send to patient once you’ve reviewed and finalized your patient’s plan.
Journeys billing and payment
Fullscript bills your patient directly for the cost of their Journey and manages all future Journeys payments.
With labs, we offer a range of billing methods including the ability to add a custom fee for a labs related service such as your interpretation time.
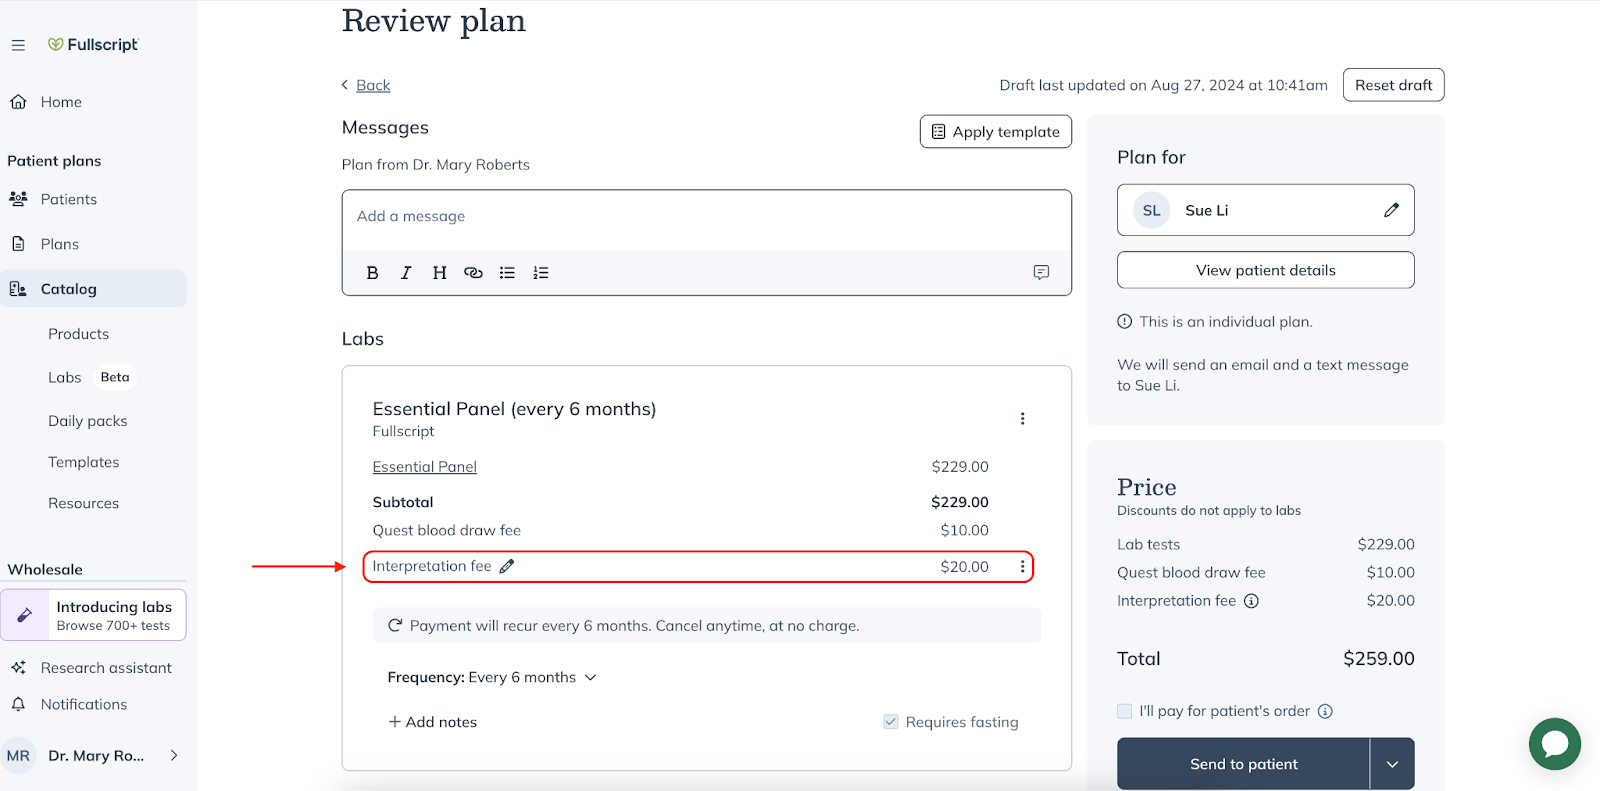
Add an itemized custom fee to your Journey, paid out to you once results are available.
This custom fee allows you to bill for any additional services you provide that go beyond the cost of the test itself, such as an interpretation or consultation fee.
Once a single result from your Journey panel is available, Fullscript pays out the custom fee amount directly into your account – minus a 5% fee to cover our costs.
To learn more about setting up custom fees and adjusting them per order, refer to the Billing and Payment Guide for labs.
Patient checkout
Patients are notified about their new Journey recommendation in the same way they are for supplements and other non-recurring lab testing. After you send a Journeys recommendation, the patient will receive an email notification and as well as a text message if that phone number has opted-in to this notification.
Patients can then view their most recent plan and add their Journey panel to their cart for checkout.
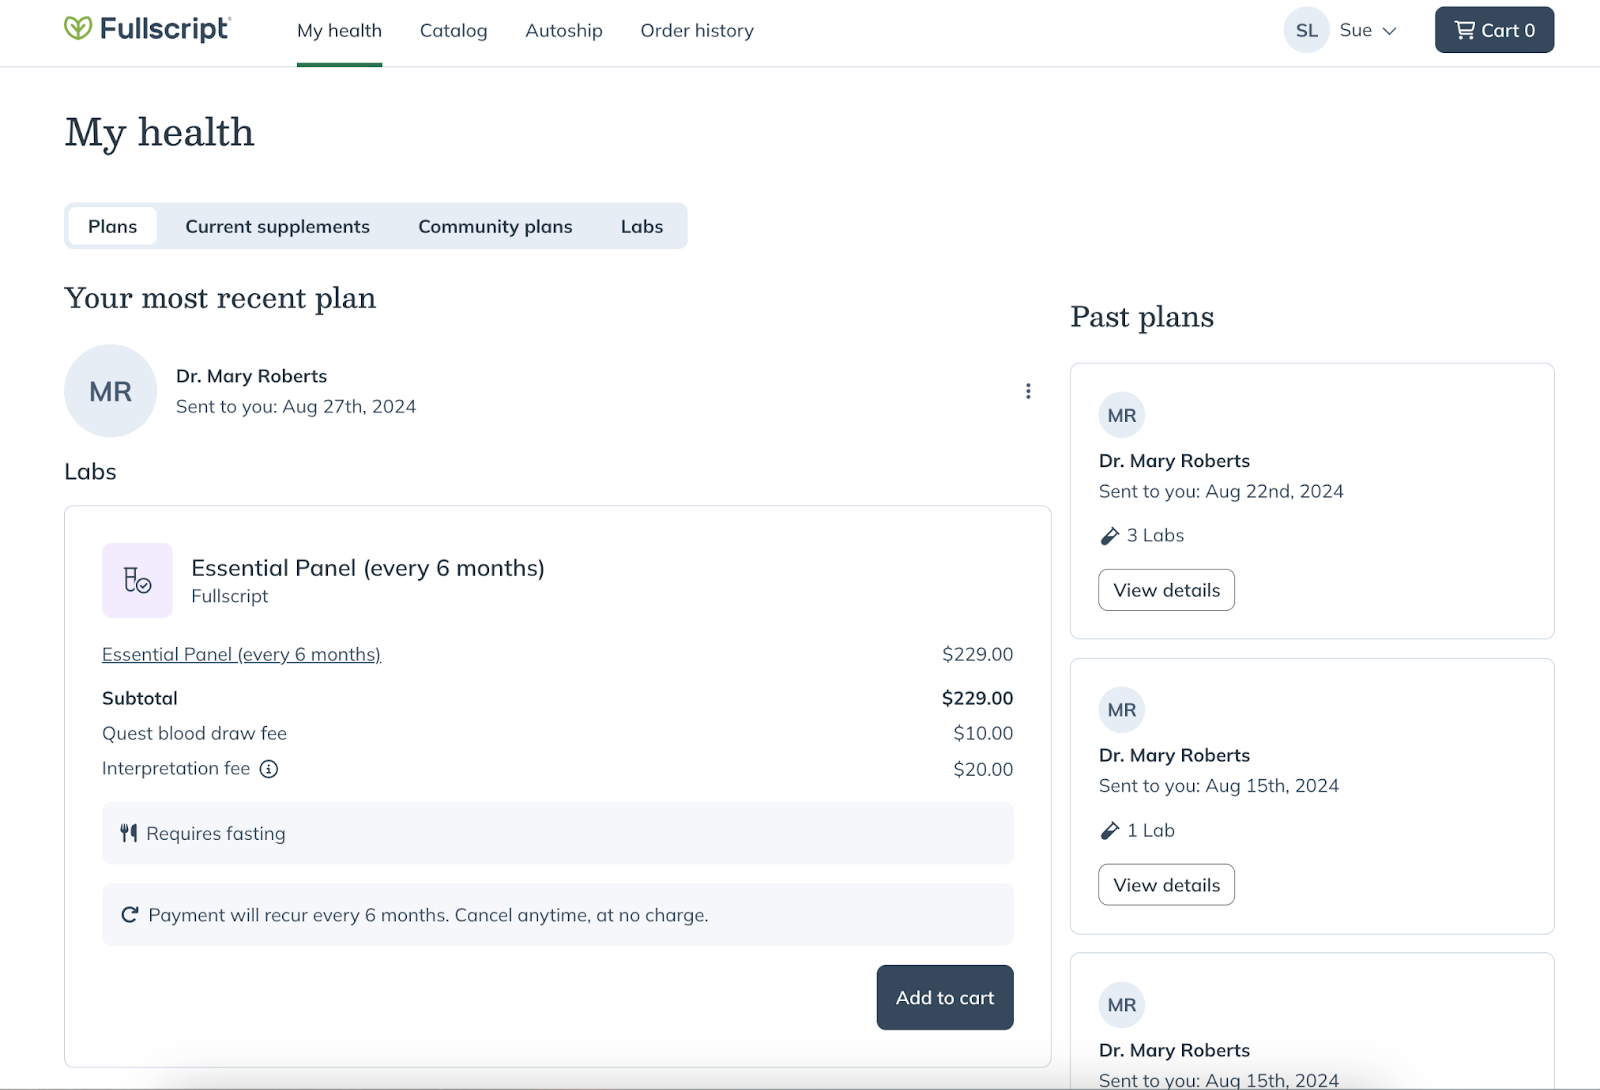
Patient view of a plan containing a recurring testing recommendation with Journeys.
To learn more about their Journey, patients can click on the Essentials or Comprehensive panel, where the frequency of their recurring testing is displayed. On this page, patients can explore:
- A short video explaining the benefits of recurring testing
- What to expect during the testing process
- The biomarkers included in their panel
- Test preparation instructions
- Age and state restrictions
- Payment and cancellation policies
Patient view of their recommended Journey to learn more about what to expect in the process, and which biomarkers are tested.
Patients will click Add to cart and proceed through checkout in the same way they currently do for other lab testing and supplements.

After adding their Journey to the cart, patients will review the total price and Continue to checkout.
In the first checkout screen, the patient will input their name and address.
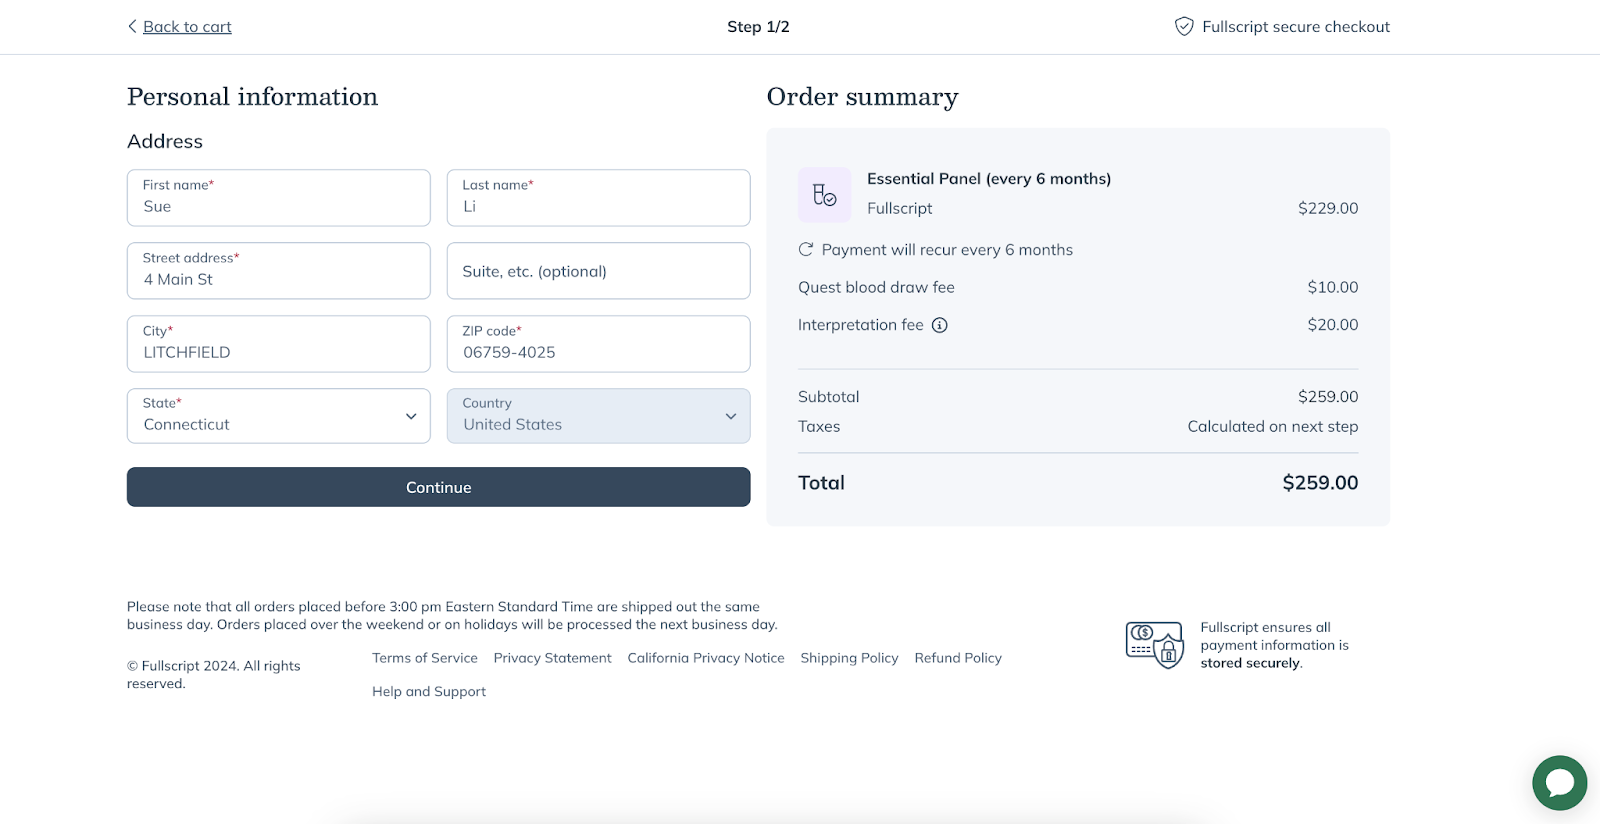
Patients will complete their name and address, which will autosave for future orders.
In the final checkout step, patients will complete payment with a credit card, review and place their order.

Patients will input their card payment information and place their order to finalize their recurring testing with Journeys.
Patient testing experience
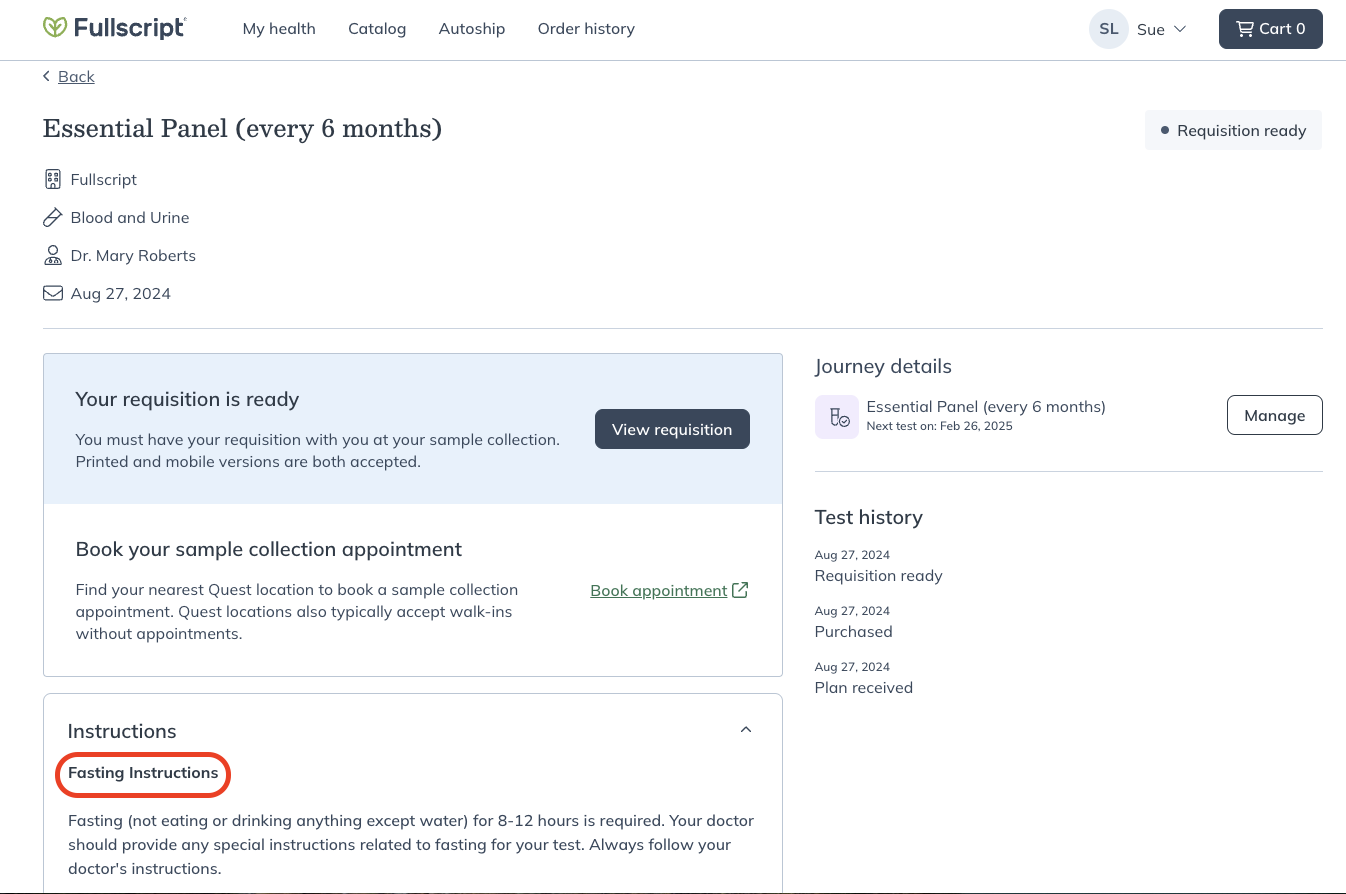
After a patient completes payment, they will receive an email notification as soon as their Quest digital requisition form is available in their Fullscript account. While it can take up to 24 hours to generate this form, patients typically receive the link within an hour or less.
The Quest digital requisition form is required to schedule their blood draw with Quest. Patients can either print the form or display the digital version directly from the Fullscript mobile app when they arrive at the Quest location for their blood draw.
Patient view of their Journeys order details where they can access their digital Quest requisition and schedule their blood draw.
Patients will schedule their blood draw right from the link below their requisition form. They have already paid the $10 Quest blood draw fee during checkout, so there’s no further payment due when scheduling their appointment or when they arrive at the Quest patient service center.
View the full instructions we provide your patient to schedule and complete their Quest blood draw.
Both the Comprehensive and Essentials Journeys require fasting. This requirement is clearly noted in the patient’s account, allowing them to properly prepare and schedule their blood draw at a convenient time.
Patient testing instructions include fasting directions before their blood draw with Journeys.
Accessing testing results for Journeys
Once testing results are available, you’ll receive an email notification with a link to view your patient’s finalized Journeys results in the same way you do when ordering other lab testing through Fullscript. For more information on tracking testing status and accessing results, learn more about your lab orders dashboard.

The practitioner Test details view when results are available for the patient’s Journey.
Test result interpretations and visualizations
Once patients get their blood drawn and the finalized testing results arrive in Fullscript’s platform you can begin shaping your patient’s Journeys interpretation.
Click Interpret Results from the Test details view to start this process.

At the top of the Interpretation of Results page, you’ll find key information, including the panel’s ordering frequency, the patient’s name, and the date the Journey was paid for. You can also access the original Quest Diagnostics PDF by clicking Results.pdf.
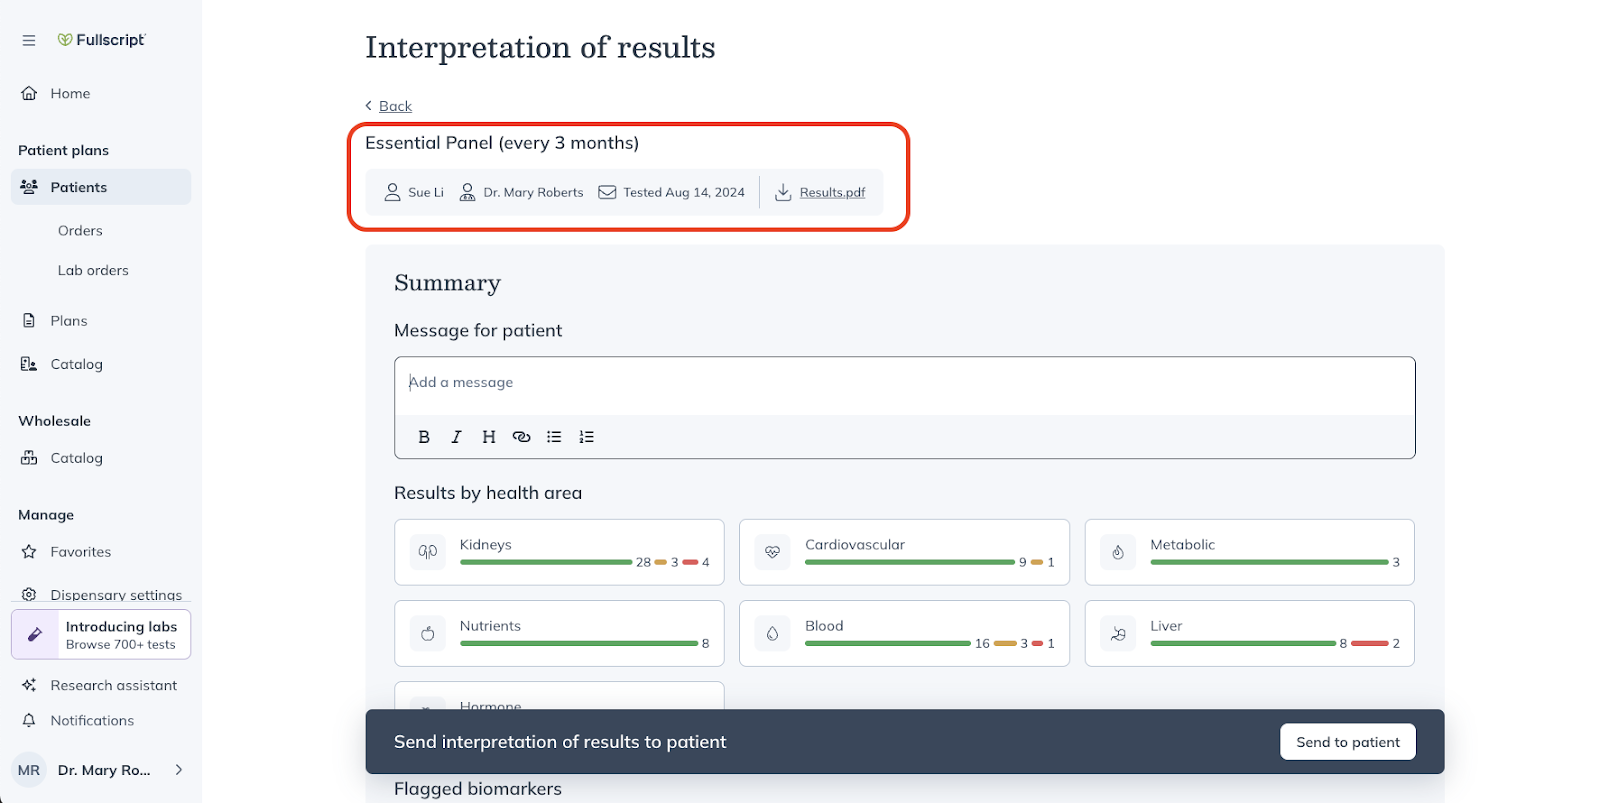
Find key order details at the top of the results interpretation.
The Summary section at the top of the interpretation includes:
- Message for Patient: Use this open text area to personalize and recap your patient’s testing results. You can adjust or delete this content at your discretion.
- Results by Health Area: Visualize how your patient’s results align across each health category.
- Flagged Biomarkers: Highlight specific areas of concern by flagging biomarkers that need attention.
Our intuitive color coding system simplifies complex results to show optimal ranges as defined by our integrative medical team and the standard reference range.
- Green: Indicates the test value is within an optimal range.
- Orange: Signifies high or low suboptimal lab values that fall between the standard reference range and an optimal range.
- Red: Represents high or low results based on Quest Diagnostics’ standard reference ranges.
Scroll down from the Summary section to view All Biomarkers. This view allows you to see all biomarkers at a glance, along with your patient’s value, optimal range status, and units of measurement.
Use the search bar to find individual biomarkers, or filter by Health Area or Marker Status to narrow your search.

Search functions within the results interpretation allow you to filter by health area or marker status.
Expand the caret icon next to each biomarker to view additional details, including a full graph that visualizes how your patient’s results align with both optimal and standard reference ranges.
For each biomarker result, the Note for your patient section will be pre-populated with an interpretation generated by our state-of-the-art data and machine learning systems. These systems leverage the latest research in integrative medicine to offer a clear, digestible summary that helps patients understand what their results may indicate.
It’s important to note that the optimal ranges and interpretations associated with Journeys are not medical diagnoses or treatments. They are not a substitute for your professional judgment in individual cases and are not intended to provide medical or professional advice.
As the practitioner, you have the flexibility to edit or remove the pre-populated interpretations entirely to best suit your patient’s needs.
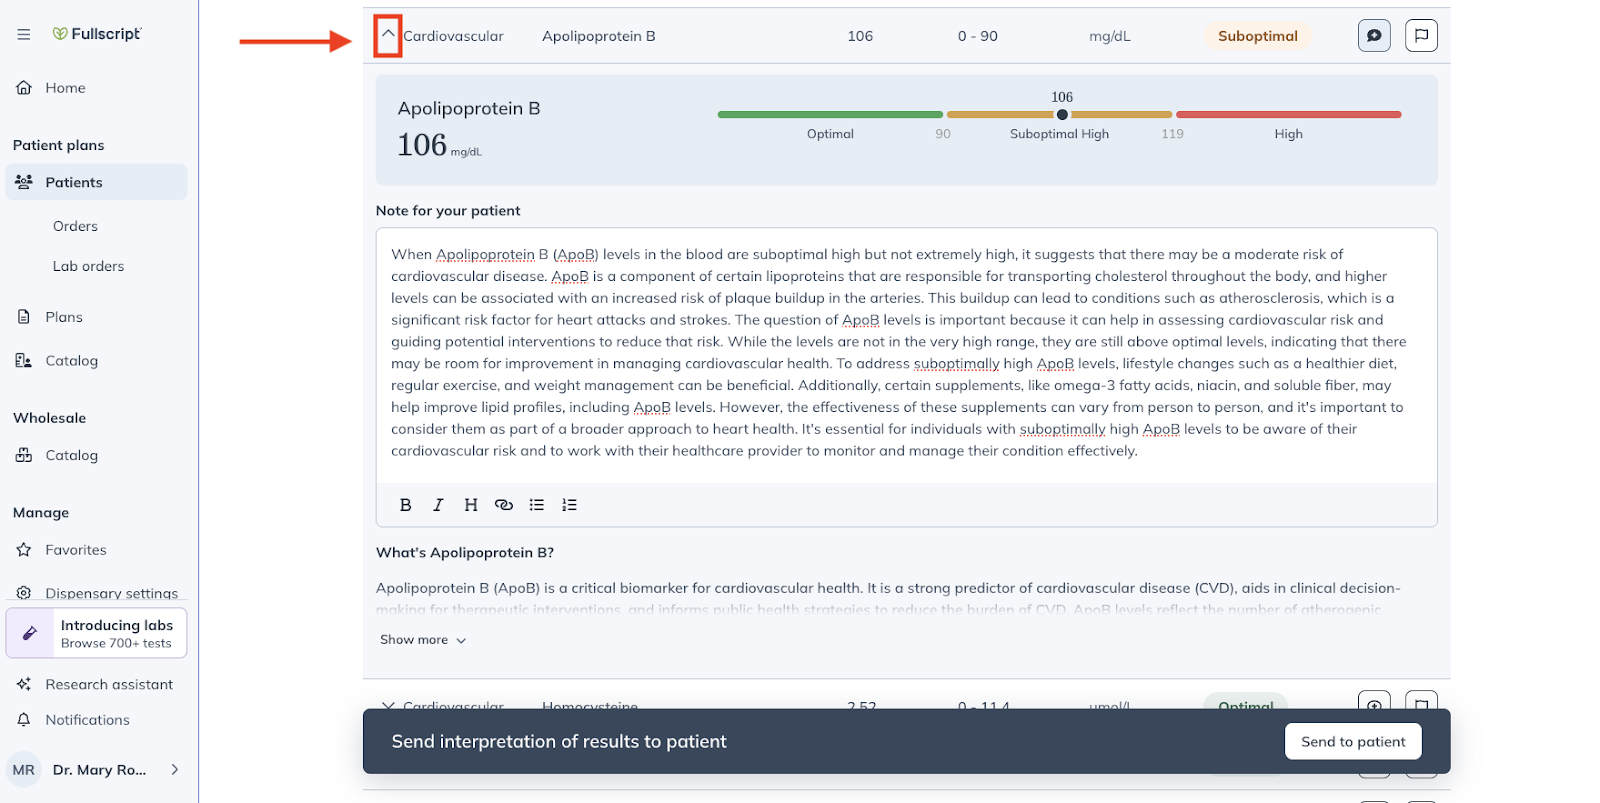
Expand each biomarker to visualize your patient’s testing value within optimal and standard reference ranges, with the ability to edit the results interpretation.
Underneath the interpretation, you will be able to view a high-level definition of the biomarker itself and how it informs overall health.
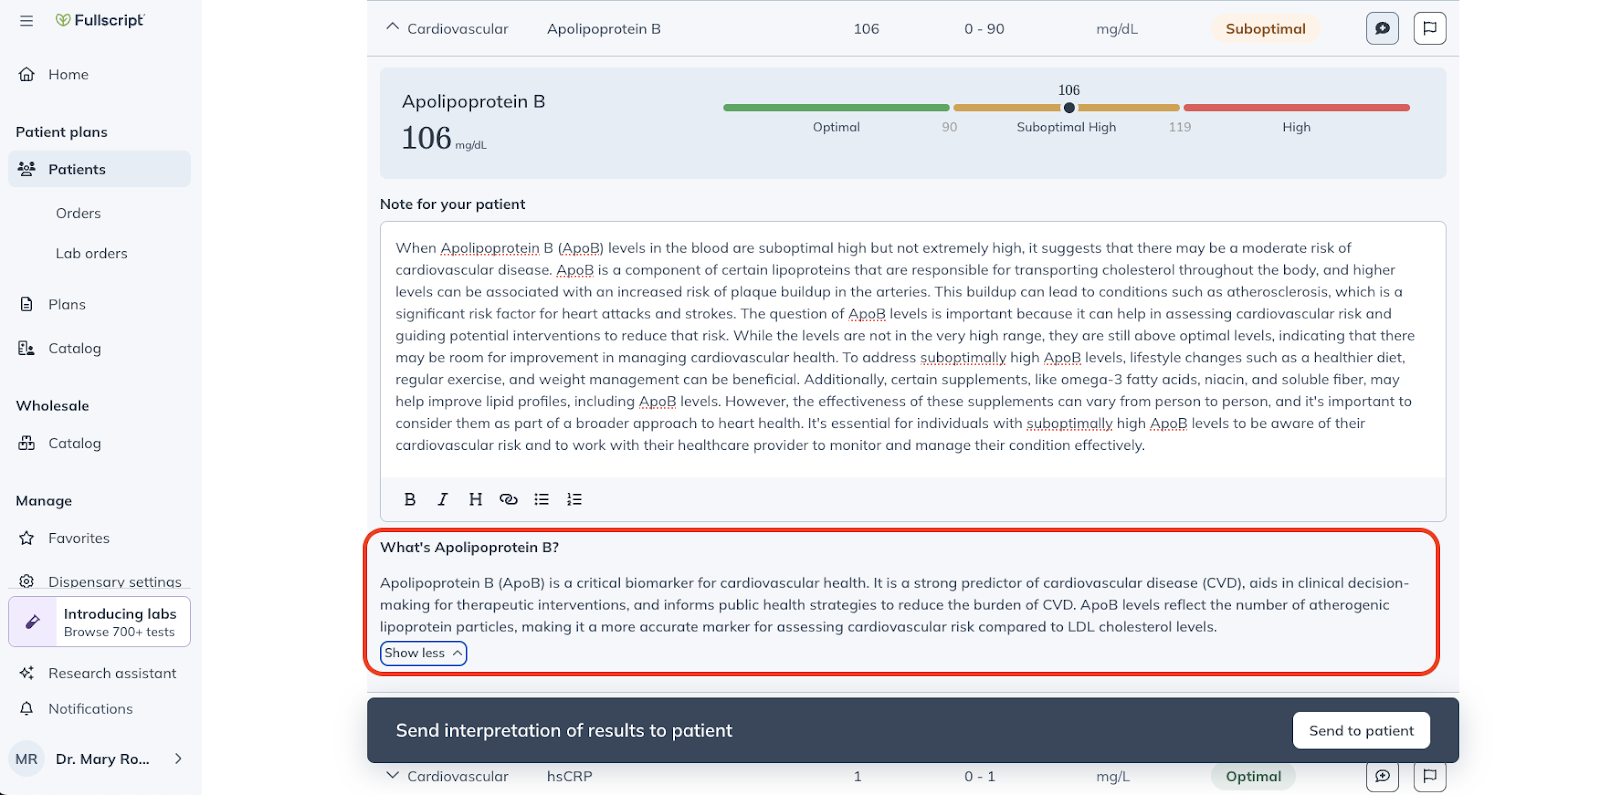
View the biomarker definition beneath the Note for your patient.
Keep your interpretation report focused and actionable by highlighting key biomarker values you want to emphasize. These flagged biomarkers will appear at the top of the patient’s results summary. To remove a biomarker from this section, simply deselect the flag icon.

Flag a biomarker to highlight it in the patient’s summary section at the top of their interpretation.
Once you’ve finalized the interpretation and are ready to send the results to your patient, simply click the Send to patient button in the banner at the bottom of your screen.

Select the Send to patient button in the bottom banner once you’re ready to share the results interpretation.
After sending the interpretation to your patient, you’ll see this reflected in the Test details view as the status of your patient’s panel changes to Interpretation shared.
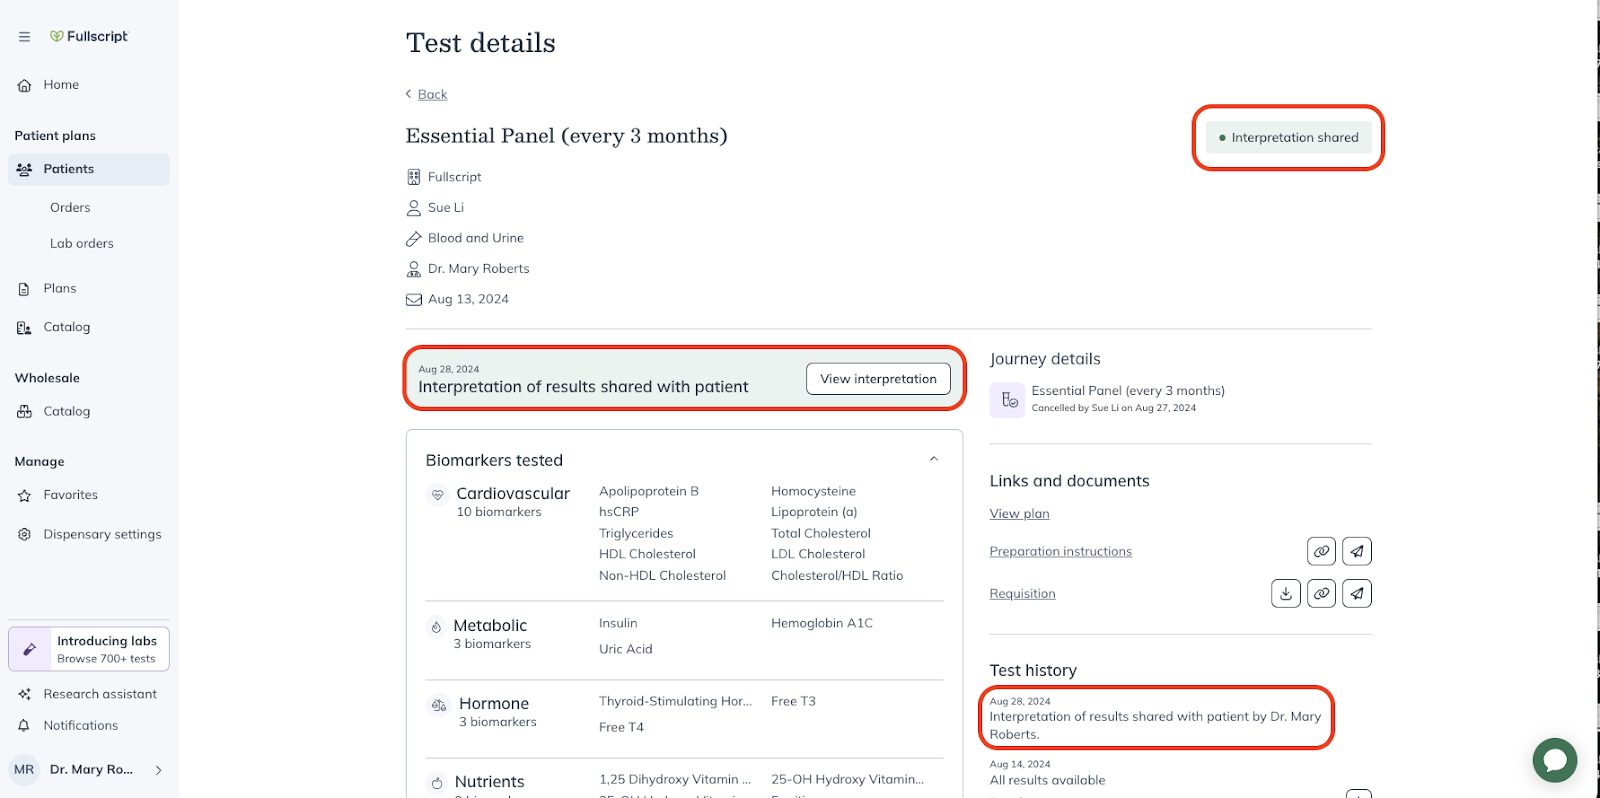
The Test details view reflecting that the results interpretation has been shared with the patient.
To see how your patient will view their results interpretation, click View interpretation. If you need to edit your interpretation, select Edit interpretation from the top right to make any changes.
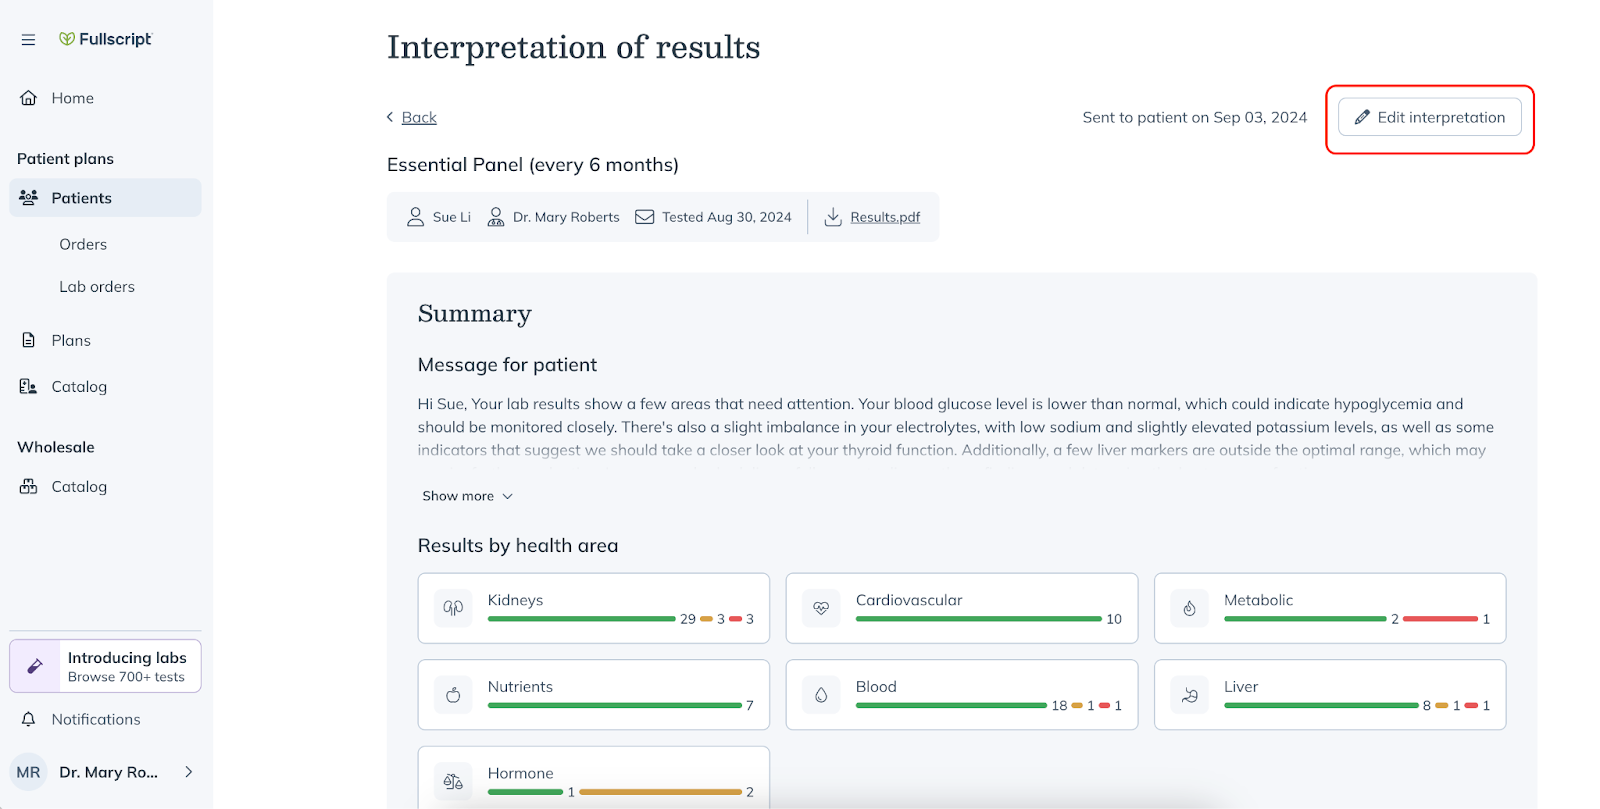
You can edit the interpretation to make any changes after you’ve shared results with the patient.
Patient results experience
Once you send the results interpretation to your patient, they will receive an email notification with a link to view their results in their Fullscript account.
The patient’s interpretation experience is designed to make their comprehensive results clear and easy to understand.
- At the top, they will see your summarized note.
- Below that, a single bar graph will highlight the total number of optimal, suboptimal, and out of range biomarkers.
- Next, any individual biomarkers you flagged will be displayed.
- Finally, the patient can view all results, either broken down by health category or all on one page.
The patient can click into any biomarker to view the interpretation as well as information about the biomarker itself. This content reflects any changes you have made to the suggested text.

The patient experience of their results summary for Journeys.
Patients have access to the original Quest Diagnostics results through the Download button on the right side of their interpretation if they would prefer to have access to a printable copy.
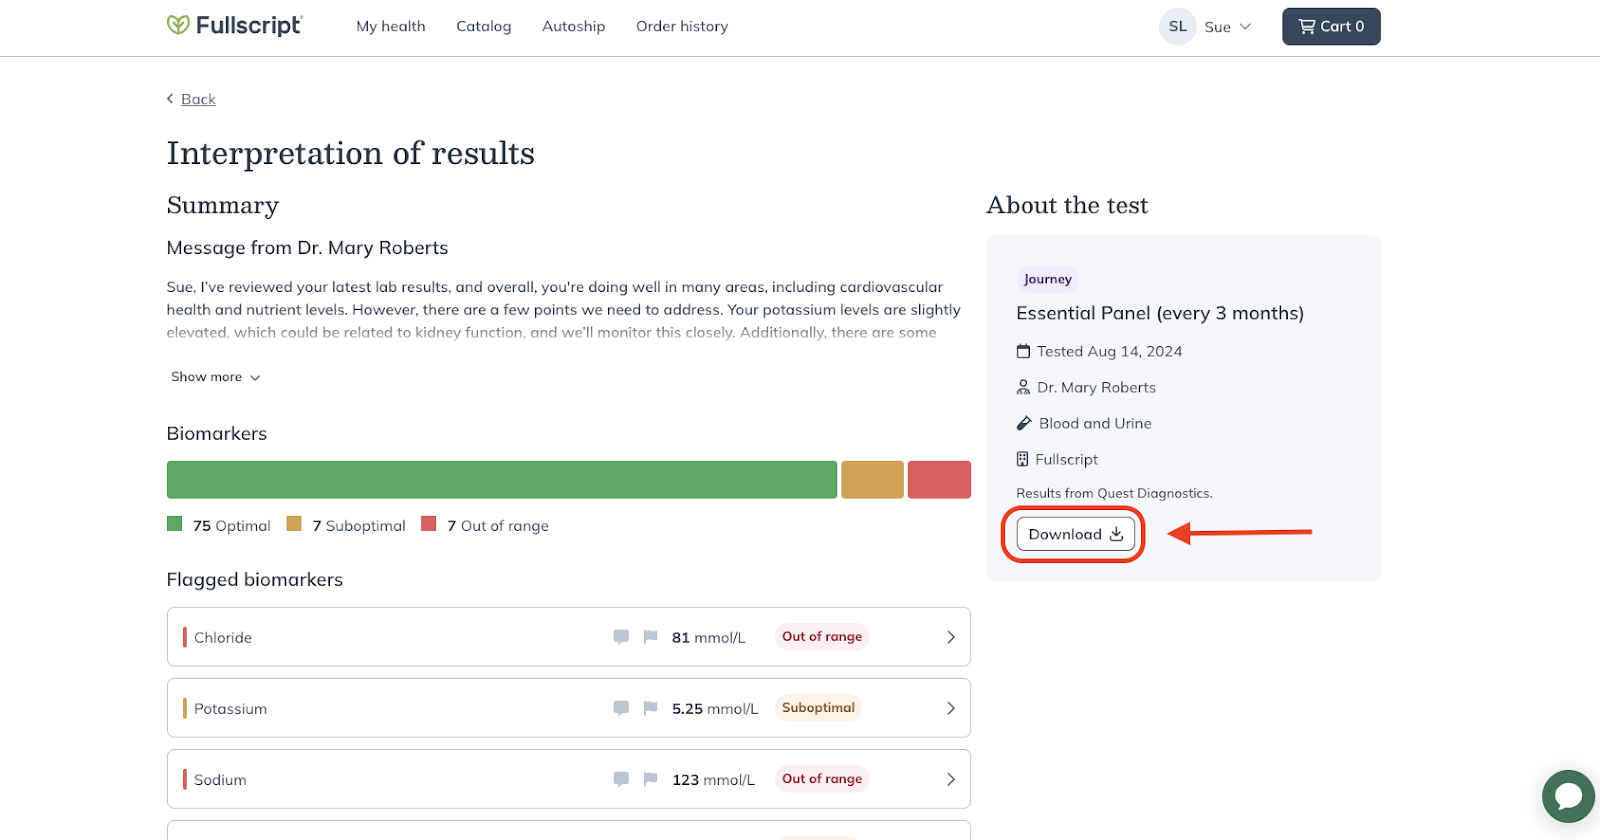
Patients have the option to download the original Quest Diagnostics results PDF.
Patient management for recurring testing orders
Patients can conveniently manage their recurring tests within the Labs tab of their Fullscript account. The top banner in their Labs area displays any recurring tests from Journeys, including the order frequency and their upcoming test date.
By clicking Manage, patients have the option to cancel their recurring testing or contact our support team to adjust their billing method.
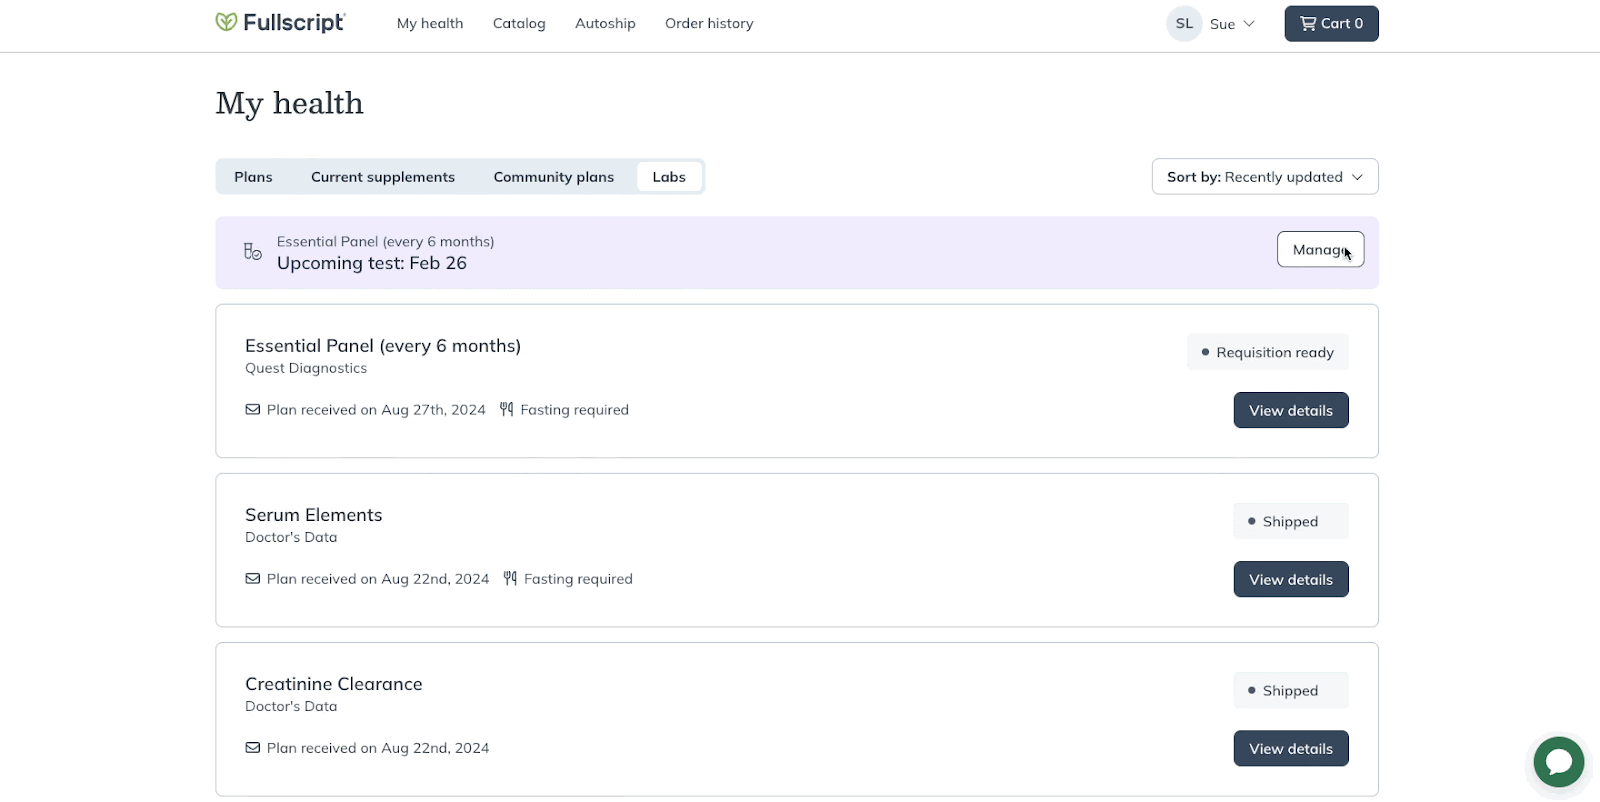
Patients can manage their Journey from their Fullscript account to cancel their recurring order or change their billing method.
Practitioner management for recurring testing orders
The staff and practitioners who share your practice account can also manage and cancel recurring testing orders from the Test Details view of your Journeys order.
To discontinue a recurring testing order, select Manage and then Cancel Journey.
If you need to change testing frequency or select a new panel, you’ll need to cancel the current Journey and create a new order to make those adjustments.

Manage the patient’s recurring testing and cancel as needed from your practitioner account.